COLORFUL

You won’t believe how easy it is to make these cute Christmas Tree Brownies from a simple brownie box mix and a couple of pantry items. These are super easy to make and will be the talk of the party!
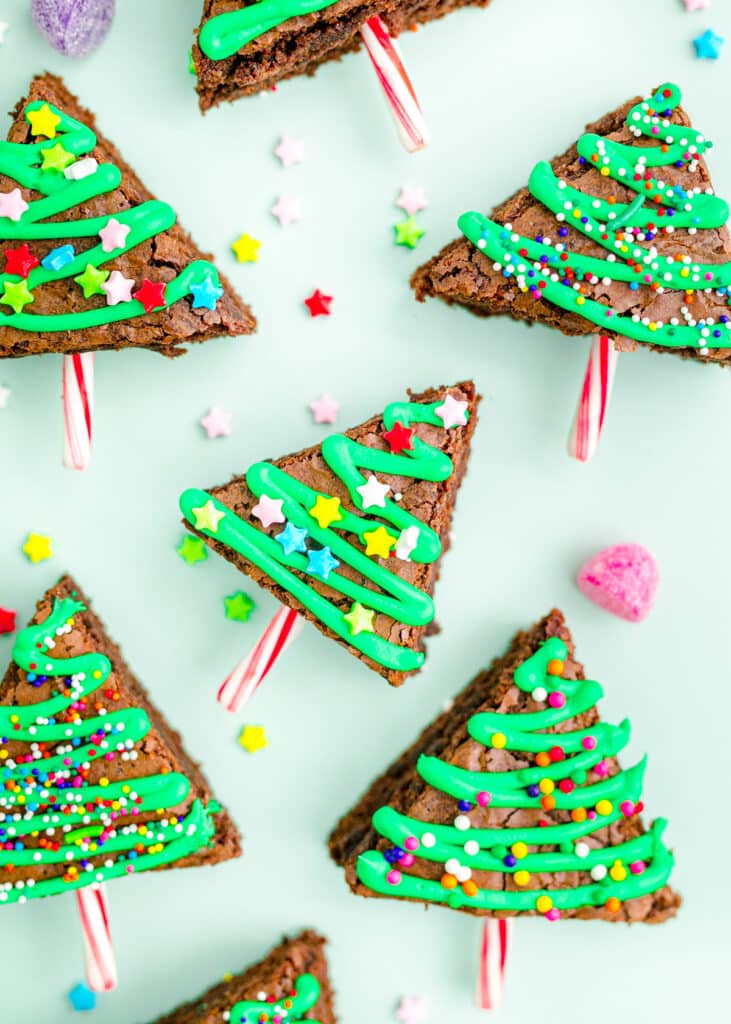
You can use these adorable brownies to decorate your Christmas dessert table or as individually wrapped gifts to give out. You just use a box brownie mix, green frosting, sprinkles, and your creativity and your Christmas Brownies will be done, I even add little candy canes to make a tree trunk so there is no confusion. You can also use your favorite recipe for homemade brownies from scratch if you have one, the best type of recipe for these little trees is fudgy brownies.
If you want to upgrade your Christmas Tree Brownies you can use my Chocolate Buttercream recipe (without the cocoa) and add green food coloring to it and pipe it on instead of the canned white frosting. This will result in a much darker green, but a whole lot of delicious flavor. You could also use this to frost your brownies all over, then cut and still use canned vanilla frosting with green food coloring
Why You’ll Love This Recipe
- It doesn’t get any easier, just make brownie box mix, bake, cool, cut, and decorate
- This is a great easy recipe to do with the kids
- These little Christmas trees are perfect for any Christmas party, especially if you need a “craft” for the kids to do
- Easy holiday treats for a cookie exchange to put you in the holiday spirit
Ingredients:
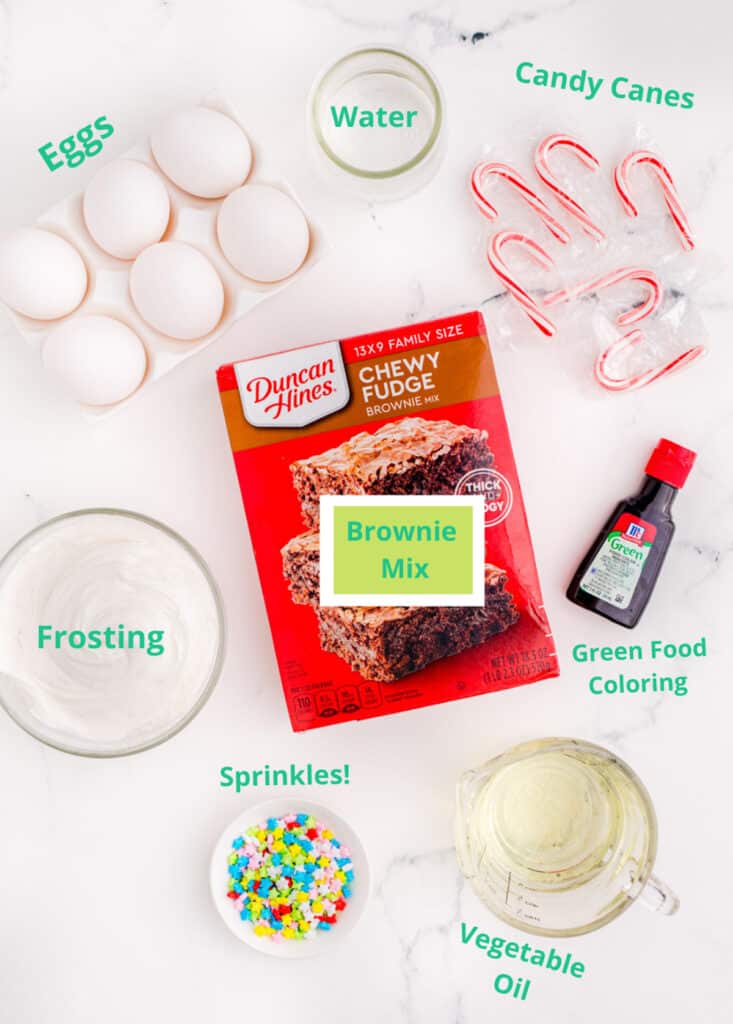
- boxed brownie mix and ingredients recommended (usually oil, eggs, and water)
- egg yolk
- Jar of white frosting
- Green Food Coloring
- Sprinkles
See the recipe card for quantities.
How to Bake Christmas Brownies
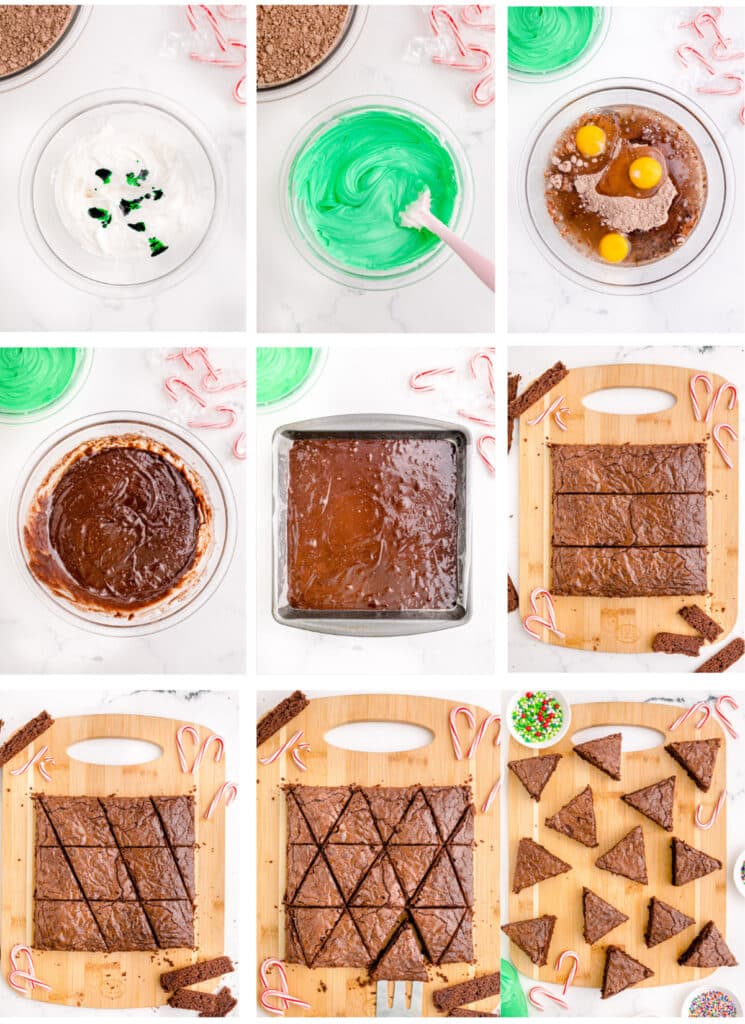
- Preheat the oven to the temperature recommended on the box of brownies mix.
- Prepare a 9X9 baking pan (preferably a light metal pan) by lining it with parchment paper. You want to leave extra parchment paper over the edges so that you may easily remove the whole pan of brownies later.
- Use a whisk to stir together the ingredients recommended on the box of brownies and 1 egg yolk. (If this is too challenging, then use a spatula). We don’t want to over-mix, so mix just until the flour disappears.
- Bake the brownies on the middle rack in your oven.
- Check the brownies a few minutes before the minimum time recommended on the box. You do not want to overbake them. Insert a toothpick to test doneness. There should be some streaks of batter on the toothpick. If they are not at this point yet, give them just a few more minutes at a time.
- Leave the brownies in the pan and place it on a cooling rack. After a few minutes, move the pan into the fridge.
- While the brownies are cooling, mix together the white frosting and green food coloring.
- Remove the brownies from the pan. Trim off outer edges.
- Do not cut the brownies unless they are completely cooled – if they are not – return them to the fridge and wait until they are completely cooled.
How to Cut and Decorate the Brownies
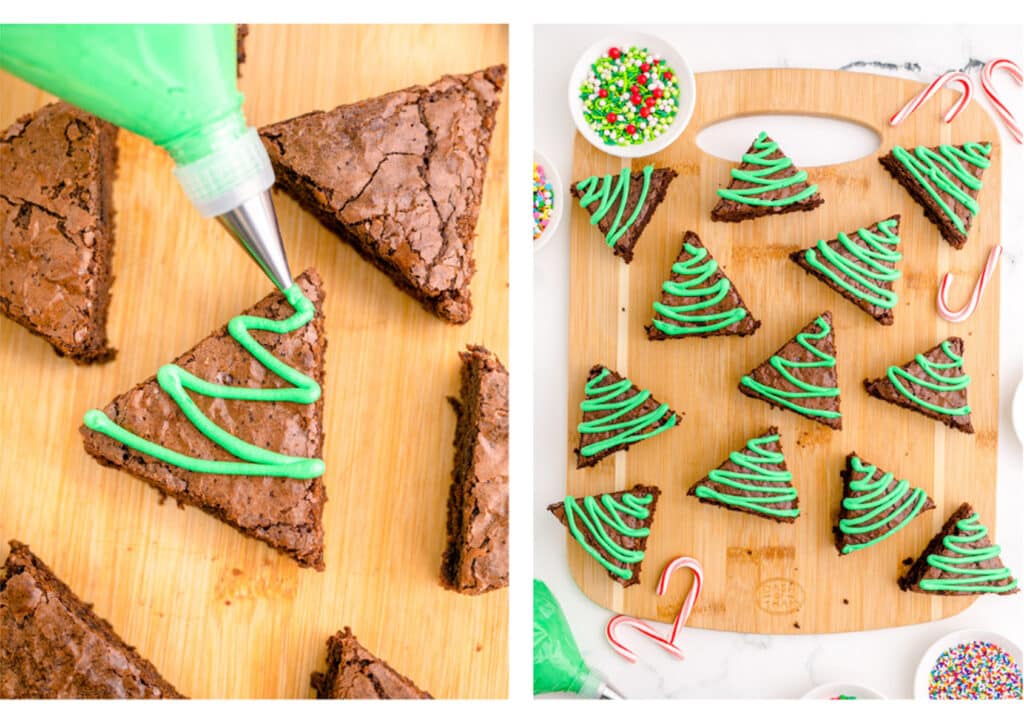
- There are 2 different ways to cut these depending on how large you want the trees to be. If you want small trees, you can get 18. Cut the brownies into 3 long strips. Then cut the strips into triangles – this will make 3 rows with 6 triangles each. (Cut 3 equal squares from each strip, then cut the squares in half on the diagonal.) They will be small trees. If you want large trees, you can get 8. Cut the brownies in half down the middle. You will be able to cut 4 equal size triangles from each half. (It is like a zig-zag pattern.) It will only work if you trim a little off of each end, at an angle.
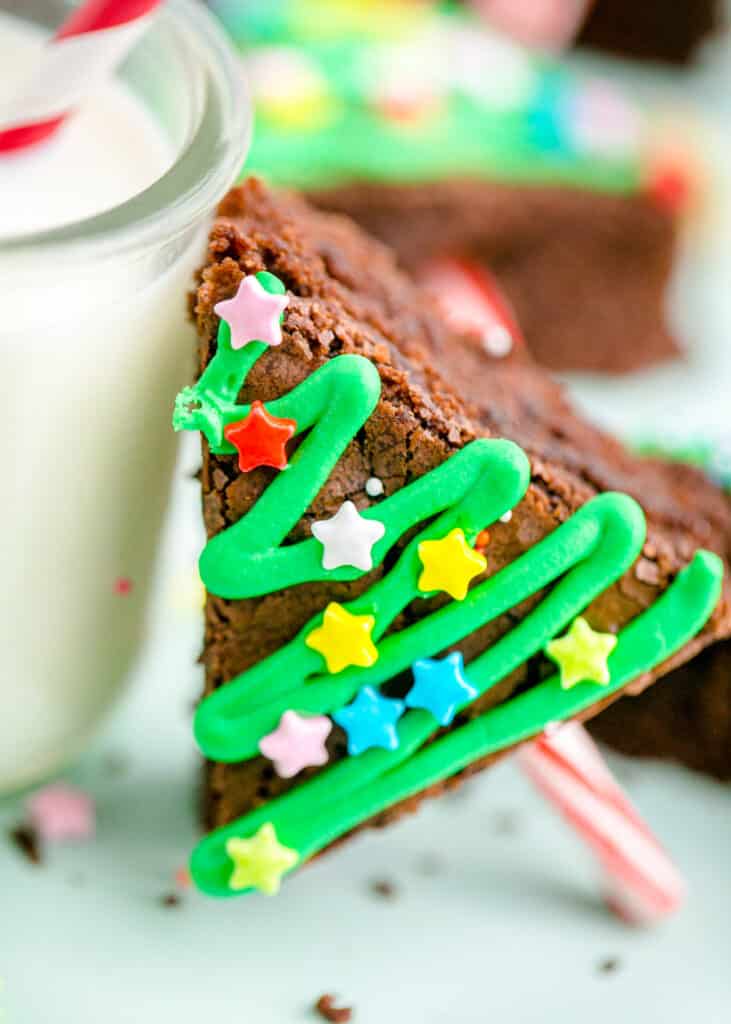
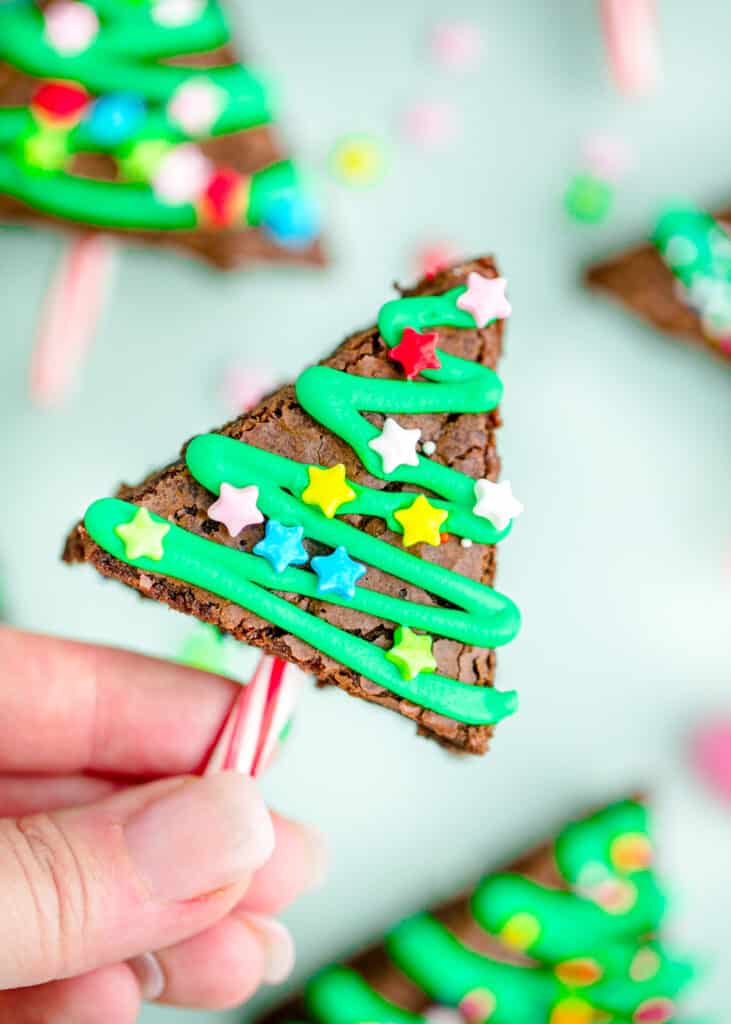
- Decorate with green icing and sprinkles. Stick a cut candy cane in the bottom of the triangle to be the stem of your Christmas tree.
Substitutions
- You can also use pre-tinted green buttercream in a jar or make your own from scratch!
- Red food coloring added to frosting would also make fun decorations
- You can make these fun brownies in heart shapes with red frosting for Valentine’s Day or any other shape depending on the time of year.
Variations
If you want to make thinner brownies you can use a cookie sheet with an edge (jelly roll pan) to get a larger sheet of brownies that are thinner. I would still advise trimming the edges of your brownies so you don’t have any odd thicker/tougher pieces on your Christmas tree triangles.
Equipment
- 9X9 baking pan
- Whisk
- Spatula
- Parchment paper
Storage
These brownies will keep for 1 week in the fridge or 3 months in the freezer.
Frequently Asked Questions About The Recipe:
How can I make sure that my brownies are fudgy instead of cakey?
Make sure that your eggs are at room temperature. And if you have a recipe that calls for butter, that should be room temperature as well. Only stir the batter the bare minimum. And don’t overbake!
I’m finding the brownies hard to cut neatly – any advice?
Yes, you want to make sure that the brownies are very well cooled. You may even want to put them in the freezer for a bit, depending on the denseness of your brownies.
I don’t have parchment paper – can I just spray the baking pan?
For this recipe, it is really important that the whole pan of brownies removes well. If you don’t have parchment paper, you could use tin foil.
Can I use my electric mixer to mix the brownie batter?
To keep these brownies as dense as possible we really don’t want to over-mix the batter. So, it is better to mix the batter by hand using a whisk and then a spatula if needed, just until the flour disappears.
Could I use a glass baking dish?
I recommend a light metal dish for these brownies because that will produce chewier brownies, but I’m sure it will be fine to use a glass baking dish.
Top Tip!
Trim the thicker/tougher edges of the brownies before you start to cut the strips and triangles. And make sure to refrigerate the brownies after baking, they are SO much easier to cut cold!

INGREDIENTS
- 18 oz brownie mix, box mix
- 2 eggs
- 1/4 cup water
- 1 egg yolk
- 1/2 cup vegetable oil, or what your box calls for
- 16 oz vanilla frosting
- 14 candy canes, mini
- Sprinkles
INSTRUCTIONS
- Preheat the oven to the temperature recommended on the box of brownies mix.
- Prepare a 9X9 baking pan (preferably a light metal pan) by lining it with parchment paper. You want to leave extra parchment paper over the edges so that you may easily remove the whole pan of brownies later.
- Use a whisk to stir together the ingredients recommended on the box of brownies and 1 egg yolk. (If this is too challenging, then use a spatula). We don’t want to over-mix, so mix just until the flour disappears.
- Bake the brownies on the middle rack in your oven.
- Check the brownies a few minutes before the minimum time recommended on the box. You do not want to over bake them. Insert a toothpick to test doneness. There should be some streaks of batter on the toothpick. If they are not at this point yet, give them just a few more minutes at a time.
- Leave the brownies in the pan and place it on a cooling rack. After a few minutes, move the pan into the fridge.
- While the brownies are cooling, mix together the white frosting and green food coloring.
- Remove the brownies from the pan. Trim off outer edges.
- Do not cut the brownies unless they are completely cooled – if they are not – return them to the fridge and wait until they are completely cooled.
- There are 2 different ways to cut these depending on how large you want the trees to be. If you want small trees, you can get 18. Cut the brownies rinto 3 long strips. Then cut the strips into triangles – this will make 3 rows with 6 triangles each. (Cut 3 equal squares from each strip, then cut the squares in half on the diagonal.) They will be small trees. If you want large trees, you can get 8. Cut the brownies in half down the middle. You will be able to cut 4 equal size triangles from each half. (It is like a zig-zag pattern.) It will only work if you trim a little off of each end, at an angle.
- Decorate with green icing and sprinkles. Stick a cut candy cane in the bottom of the triangle to be the stem of your Christmas tree.
NUTRITION
Calories: 432kcalCarbohydrates: 64gProtein: 3gFat: 18gSaturated Fat: 3gPolyunsaturated Fat: 8gMonounsaturated Fat: 6gTrans Fat: 1gCholesterol: 37mgSodium: 176mgPotassium: 21mgSugar: 49gVitamin A: 52IUCalcium: 6mgIron: 1mg
Tried this recipe?Mention @sweettea_and_sprinkles or tag #sweetteaandsprinkles


Totally making these!
What a fantastic idea! These are so much fun! Simple but delicious too – the brownies are soooo moist!