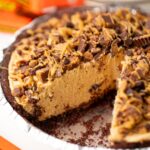
Reese's Peanut Butter Pie
Discover the ultimate no-bake Reese's Peanut Butter Pie recipe! With a decadent peanut butter filling and rich chocolatey toppings, it's the dessert you never knew you needed.
Servings: 8
Calories: 614kcal
Ingredients
- 1 Chocolate Graham Cracker Crust store-bought or homemade
- 1 cup Peanut Butter creamy
- 1 cup Powdered Sugar
- 8 oz Cream Cheese softened
- 8 oz Cool Whip thawed
- 8 Reese's Peanut Butter Cups chopped
- ½ cup Mini Semi Sweet Chocolate Chips
- Optional: Melted Peanut for Drizzling
Instructions
- In a large mixing bowl, combine the creamy peanut butter, softened cream cheese, and powdered sugar. Beat together using an electric mixer until the mixture is smooth and well combined.
- Next, gently fold the thawed Cool Whip into the peanut butter mixture using a spatula until it's well combined and no streaks remain.
- Spoon the peanut butter pie filling into the premade crust and smooth out until the crust is filled and the filling is even.
- Sprinkle the chopped Reese's peanut butter cups over the top of the pie. Add mini chocolate chips and drizzled peanut butter on if you’d like!
- Place the pie in the refrigerator for at least 2 hours (or overnight) to ensure everything is chilled.
- Slice using a sharp knife, serve, and enjoy!
Notes
Storage Information
Okay, so on the off-chance you have leftovers (a rare occurrence in my home), you'll want to keep this pie looking and tasting its best. Store any uneaten slices in the refrigerator, covered with plastic wrap or in an airtight container. It should keep for 3-4 days, but let's be honest – it won't last that long! As for reheating, this pie is best served chilled, so no need to reheat. Just slice and enjoy straight from the fridge.Can This be Frozen?
Absolutely! This pie is freezer-friendly. Before freezing, make sure it’s well wrapped in plastic wrap or aluminum foil to prevent any sneaky freezer burns. When you’re ready to serve, just transfer it to the fridge for several hours, or ideally overnight, to thaw.Can This Be Made Ahead of Time?
Oh, 100%! If you're like me and love prepping things ahead, you can make this pie a day or even two before your event or gathering. The flavors meld wonderfully during that time in the fridge. Just remember to add the toppings shortly before serving for that fresh, picture-perfect look.Substitutions & Variations
Life's too short to not play around with recipes. So, here are a few ideas:- Crust Variations: Not a chocolate fan (who are you?!)? Use a regular graham cracker crust or an Oreo crust.
- Go Nutty: Swap out the peanut butter for almond or cashew butter.
- Toppings Galore: Add some caramel drizzle, or maybe some crushed pretzels for a sweet and salty twist.
Helpful Cooking Notes
Alright, buddy, a couple of pro-tips for the road:- Creamy PB: For the silkiest filling, opt for commercial peanut butter brands as they tend to be smoother. Natural peanut butter might make the filling a bit grainy.
- Knife Trick: Before slicing, dip your knife in hot water. It’ll glide through the pie like butter.
- Chill Factor: Don’t skimp on the chill time! The pie firms up and the flavors come together beautifully during that time....the longer you chill, the better!
Nutrition
Calories: 614kcal | Carbohydrates: 47g | Protein: 14g | Fat: 44g | Saturated Fat: 16g | Polyunsaturated Fat: 6g | Monounsaturated Fat: 19g | Trans Fat: 0.01g | Cholesterol: 35mg | Sodium: 410mg | Potassium: 416mg | Fiber: 4g | Sugar: 26g | Vitamin A: 447IU | Vitamin C: 0.1mg | Calcium: 103mg | Iron: 2mg